Previously, I wrote an entry on a baju kurung top that I made. I finished the neckline with the 'tulang belut' stitch. I managed to finish the kain (skirt) of the baju kurung, but with disastrous results! Everything was measured wrongly, especially the waist and it turned out too big. I've still to rectify it. And yet, I've been thinking of making another baju kurung (its because I have such lovely voiles that have been begging me to start working on them!). Anyways, I want to share a really great tutorial that I found on senijahitan of another stitchery technique called the 'karipap/kerang' stitch. The results look very pretty. Hope to try it soon. In the meantime, enjoy the video tutorials.

Showing posts with label tutorial. Show all posts
Showing posts with label tutorial. Show all posts
Tuesday, September 21, 2010


Friday, August 27, 2010
Tutorial: Pillowcase

Since starting on my little one's quilt, I had wanted to complete the gift by making other complimentary accessories such as pillowcases. My mum had just finished sewing a few pillowcases, so I got excited to make mine, or rather, his. I had some fabric leftover from making the backing of the quilt and decided to use them for this mini project.

Ingredients:
- Piece A (front): 1 piece of 28 1/2" x 18 1/2" fabric
- Piece B (back): 1 piece of 29 1/4" x 18 1/2" fabric
- Piece C (tab): 1 piece of 6 1/4" x 18 1/2" fabric
- coordinating thread
Note: Seam allowances are 1/4", unless otherwise stated.
Steps:
1) First, hem one short side of Piece B. This will be the opening of the pillowcase. You can hem any way you like, but I hemmed by folding in 1/2" twice and then sewing near the edge of the hem.
2) Then hem one short side of Piece C.
3) Now, take Piece A and Piece C, and with RIGHT sides together, align the open ends together (not the end with the hem). Sew the pieces together. Since I don't have a serger, I used zigzag stitches along the edges of the seam to keep the fabric from fraying. Now, fold the pieces along the seam so that the WRONG sides are together, and press. Keep the pieces in this position for sewing in the next step.
4) With RIGHT sides together (Piece A and Piece B), pin and sew along the 3 open edges. Make sure Piece A is between Piece B and Piece C when sewing this step. Again, I used zigzag stitches along the edges.
5) Finally, turn your pillowcase right side out, stuff it with a nice fluffy pillow and make your little one smile :)
5) Finally, turn your pillowcase right side out, stuff it with a nice fluffy pillow and make your little one smile :)
Tuesday, August 24, 2010
Tutorial Found: Card Holder

My little sis asked me for another handmade item. This time it was a card holder. She wanted one to match the messenger bag I made for her. At first I was thinking whether to make a zippered pouch or something similar, but then I found this really easy tutorial by Erin on how to make a business card holder. Her scrap fabrics are really cute and this was the end result using my scrap fabrics.


Click on the link for the tutorial.
Monday, August 23, 2010
Tutorials Found: Messenger Bag, Zippered Pocket, Slip Pocket, & Magnetic Clasps

When my little sis had a sneak peek at some of the fabrics I wanted to sell, she immediately asked for one of the prints from the A is for Alligator line by Jillian Phillips for Hoffman Fabrics. She asked me to make her a new messenger bag. I had never made a messenger bag before, so as usual, I decided to scout for an easy tutorial. I found a really nice one by Bonnie of Fishsticks & Fries. However, I decided to add a few details to the bag by trying out a few other tutorials by Autum of Creative Little Daisy, and in the end I came up with a messenger bag that had a zippered pocket, a slip pocket, and magnetic clasps. I did have a minor accident when putting on the magnetic clasps (ie cutting the fabric in the wrong place! yikes!), so I covered it up with some applique pieces using Steam-a-Seam 2. It was a first of sorts and I'm quite happy with the outcome. When I tried it on, it looked like a nice diaper bag as well. Hihi. Hope she'll like her new bag.


Click on this link for the messenger bag tutorial.
Click on this link for the zippered pocket, slip pocket, and magnetic clasps tutorial.
Friday, August 20, 2010
Tutorial: Knitting Supplies Tote

Previously, I made a crochet hook roll for my grandmother. When you start sewing, you'll find your momentum and it's kind of hard to stop! So I decided to make her a matching bag with an interior pocket long enough for a pair of knitting needles. I only got the idea of making this tutorial towards the end of my project, so there aren't too many pictures to share. To be honest, I've only made a box pouch and a clutch before this, so this is actually my first attempt at making a bag. I figured my mistakes while making the bag, so I put in some recommendations for better results - I hope!

Ingredients:
1) fabric for the exterior of the bag and pocket
2) coordinating fabric for the lining of the bag and pocket
3) fusible interfacing to fuse to exterior fabric (unless you're using a heavy weight fabric, then you can skip this)
3) coordinating thread
Note: Seam allowances are 1/4" unless otherwise stated.
Steps:
PART A: Preparation
1) First cut out your pieces. You should have the following pieces for the:
- BODY: 6 pieces of 17" x 17" fabric/interfacing (2 of exterior fabric, 2 of lining, and 2 of interfacing)
(it's actually better if your interfacing pieces are 16 3/4" x 16 3/4" squares so that you won't need to sew through many layers)
- POCKET: 2 pieces of 3 1/2" x 12" fabric (1 of exterior fabric, and 1 of lining)
(I would recommend adding in interfacing for the pocket as well)
- HANDLES: 4 pieces of 2 1/4" x 15" fabric (2 of exterior fabric, and 2 of lining)
(again, I think it'd be better to add in interfacing for the handles also)
2) Fuse the interfacing on to the WRONG side of the exterior fabric for all parts of the bag (ie body, pocket and handles).
PART B: Pocket
1) With RIGHT sides together, sew along 3 edges, leaving the bottom open. Turn right side out. Fold in the bottom edges about 1/4". Press all sides.
2) Topstitch top of pocket.
3) Position pocket on one of the body lining pieces and pin in place. Sew along the 3 edges, leaving the top open.
PART C: Handles
1) With RIGHT sides together, sew along the 2 long sides. Turn right side out.

2) Press and topstitch along the 2 long sides.
PART D: Body
1) Using the 2 body exterior pieces, with RIGHT sides together, sew along the 3 edges of the square, leaving the top open. Then box the 2 bottom corners. Trim excess.


2) Using the 2 body lining pieces, with RIGHT sides together, sew along the 3 edges of the square, whilst leaving about 4" or 5" open in the middle of one side (you can choose whichever side). The top should be left open (as was done for the exterior pieces). Then box the 2 bottom corners. Trim excess. Turn right side out.


PART E: Putting the bag together
1) With RIGHT sides together, align and pin the body exterior to the body lining, making sure to insert the handles in between the layers. Sew 1/2" along the top edge making sure to backstitch on the handles.
2) Turn the bag right side out through the opening in the lining.
3) Press and topstitch the top edge.
4) Sew the opening closed (if you're not lazy like me, handstitching this step would make for better results).
Maybe you could make one for your grandmother too. Next time, I'll get pictures for the tutorial. In the meantime, hope this helps!

Wednesday, August 18, 2010
Tutorial Found: Pleated Clutch

Since my attempt at making a box pouch, I wanted to try making something else (and this time I would use interfacing!). I have always loved pleated clutches because they're so pretty, so I searched the net for an easy tutorial, and there were so many out there. In the end, I found a tutorial for a lined, pleated pouch by jesskreck on Craftster which I used as a guideline. I made my own pattern and added an interior pocket to spice things up. It didn't turn out as nice as I'd hope, so I guess I'll have to do some tweaking with my pattern in the future. Recently, I found another tutorial by Skip to my Lou for a pleated pouch too. Don't you just love pleated pouches?? Next time, I think I'll make a wristlet version....
Sunday, August 15, 2010
Tutorial Found: Box Pouch

This was my first attempt at making a pouch......with lining too!....and a zipper!!.... So, I found this great tutorial by Indie House. I used what I already had in hand, which wasn't much - some leftover fabric that my sister had previously given me and I didn't even have any interfacing! Guess that's why it didn't turn out as 'boxy' as it should. So, check out Indie House's tutorial. Her pouch is just too cute!


Click on the link for the tutorial.
Friday, August 13, 2010
Tutorial Found: Crochet Hook Roll

My lovely 80-year-old grandmother has been knitting and crocheting since she was young. She would always give her handmade gifts to everyone in the family - whether it was a pair of knitted baby booties, a crochet doily to decorate a table, a pair of knitted socks, or even a knitted kopiah, and that's just to name a few. She loves passing on the knowledge and had even taught my father knitting in his younger days. I learnt some knitting from her last year, and this year, my younger brother has been knitting away with her. She loves sharing her life-long experiences and handmade gifts were always a treat. So when I found this great tutorial for a crochet hook roll by Ms Jo - I knew that I just had to make one for her! My grandmother loves cats, so I decided to use some cat fabric from Alexander Henry's 'Tangles' collection. The tutorial was really easy to follow, but the hard part for me was that I was sewing through many layers towards the end. I also skipped the small needle pocket. All in all, I had fun making it! Hope she'll like the gift.


Click on this link to go to tutorial.
Sunday, August 8, 2010
Tutorial: Hoffman Fabrics 'To the Rescue' Toddler Quilt Pictorial
Before reading any further, please be warned that I am not a professional quilter. I'm just here sharing my experience. This is my first quilting experience ever! When I saw the 'To the Rescue' line by Jillian Phillips for Hoffman Fabrics, it was love at first sight. They were too perfect for my baby boy! And coincidentally, I found a free quilt pattern by Vicki Stratton called the Easy Strips Pattern for a toddler-sized quilt. How cool is that?! It was begging me to try it out. So here goes...
Ingredients:
1) To the Rescue collection in various cuts (refer pattern)
1) To the Rescue collection in various cuts (refer pattern)
2) Coordinating backing fabric (I used 3 yards because I had to sew 3 pieces together to get the desired width, but an easier choice would be to use wide width fabric for the backing)
3) Warm & Natural cotton batting
4) Coordinating quilting thread
NOTE: Seam allowances are 1/4" unless otherwise stated.
Steps:
1) Preparing the fabric: Some quilters prewash their fabric and some don't. I decided not to do prewashing for this project simply because I bought just enough fabric and I didn't want to prewash the batting either.

2) Cutting the fabric: This is the part that I dread most in any sewing project - the cutting! I'm just not a fan. Just follow the instructions in the pattern. Once cut, organise the pieces into their respective blocks for easy sewing later.


3) Constructing the blocks: Sew the strips for each block together. After sewing each strip, press the seams. I prefer pressing the seams to one side (usually to the side of the darker fabric), rather than pressing them open. For the 'road' strip, simply follow the instructions in the pattern. I found that chain piecing this part was a big help.


4) Piecing the blocks: Once you have all the blocks ready, it's time to put the blocks together. Sew and press, sew and press, sew and press. Yes, the process is rather tedious, but the end result is breathtaking! I loved looking at the back of my quilt top!! lol...Oh yes, make sure you trim off any excess before going on to the next step. Your quilt top should be ready for sewing on the borders.
5) Sewing on the inner and outer borders: Yes, this pattern has 2 borders. I love the way the colour values play in this quilt top. Sew and press, sew and press, sew and press, and voila - a beautiful and easy quilt top ready for layering. Take a break, we're almost there!
6) Preparing the backing: When choosing backing fabric, its easier to hide mistakes with a multi-coloured and busy print, but you can always use solid fabrics provided that you are using a thread colour that blends with the fabric. I read that the backing and batting of the quilt should be bigger (at least 3" - 4" on all sides) than the quilt top when you layer the quilt as the quilting process might shrink them a bit. I also read that you should avoid sewing down the middle of the backing fabric when piecing 2 pieces of fabric together. So, instead, I added a few inches of fabric to the left and right of my backing fabric by piecing 3 pieces of fabric together to get the desired width. Sew and press. I don't know if this is how it should be done, but that's what I did.

7) Layering the quilt: Find a flat and smooth surface such as a clean floor or mattress where you can tape your backing fabric to it using masking tape. You want your fabric to be flat and taut and NOT stretched. Make sure the WRONG side of the backing is facing up. Then, lay the batting on top of the backing. It is best if your batting has been unfolded and laid out prior to layering to reduce wrinkles. Next, lay your quilt top on top of the batting with the RIGHT side facing up. Smooth it flat starting in the middle and working out towards the edges.


8) Basting the quilt: Now you have to fasten those 3 layers together temporarily so that they'll stay in place when you're quilting. You can either use basting stitches or pins. I chose the latter. Start pinning from the centre of the quilt and work outwards. I read that it is best for the pins to be about 6" apart from each other, but I basically worked with whatever pins I had. Make sure you smooth out the fabric as you pin along.
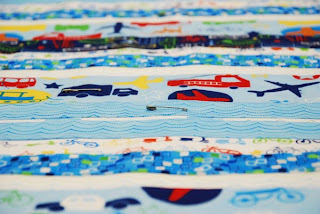
9) Quilting: You can choose to machine quilt or hand quilt as desired. I decided to go with machine quilting, though I now realise that hand quilting effects are really pretty and I should've gone with that! Initially I wanted to try free motion quilting, but in the end decided to 'stitch in the ditch' as the quilt top was full of nice long strips. As this was my first attempt at quilting, I must say that it was VERY frustrating when my machine stitching went a bit haywire. Sometimes my thread tension was off or my walking foot wasn't 'walking' enough. I must've done something wrong somewhere.... Right now, I'm still on this step. Hopefully, I can finish quilting and go on to the next two steps. I'll have to upload the pics once they're ready.
10) Binding the quilt: Refer to Heather Bailey's wonderful binding tutorial.
11) Present the quilt to your precious little one: Priceless! (I hope!! since I haven't got around to this step yet. lol)
Happy sewing!
Friday, August 6, 2010
Tutorial: Hoffman Fabrics 'A is for Alligator' Wholecloth Quilt


 A dear friend of mine wanted to give her gorgeous baby girl a handmade gift - one that would become a timeless treasure. She related to me the quilts her mother-in-law made for her hubby when he was growing up and she felt that she wanted a gift such as lovely for her own daughter. She wanted to try hand quilting, but didn't have a quilt to try it on. So I decided to help her out by putting together a simple wholecloth quilt kit for her which consisted of:
1) a ready-to-quilt wholecloth quilt
2) hand quilting needles
3) coordinating hand quilting thread
Everything would be ready for her to start hand quilting! Yey. She was ecstatic when she saw her kit and I'm so glad she loved it. Thanks for your support, dear. :)

Well, I thought I'd share a tutorial on how to make a simple wholecloth quilt. This is my first tutorial, so please bear with me! My friend specifically requested for a toddler-sized quilt, but you can do this for any size. I love 100% cotton quilts, so I used premium ingredients - 100% cotton designer fabrics, Warm & Natural cotton batting, and Gutermann 100% cotton thread.
Ingredients:
1.5 yards of fabric for the quilt top
1.5 yards of fabric for the quilt backing (I actually used 1 yard of coordinating pink fabric and 0.5 yard of coordinating green fabric, both from Hoffman's 'A is for Alligator' line)
1.5 yards of warm & natural cotton batting
coordinating thread
NOTE: Seam allowances are 1/4", unless otherwise stated.
Steps:
1) Preparing the backing: If you are using a wholecloth for your backing, you can skip this step. Since I used 2 different fabrics for the backing, I had to sew the pieces together. I cut the 0.5 yard of green fabric into 2 pieces which then measured 0.25 yard each and sewed each piece onto opposite sides of the pink fabric and pressed the seams. Not sure if that made sense, so I think you should refer to the pic below.
 2) Layering the quilt: Put the batting on a smooth and flat surface (such as a clean floor or bed) and smooth out any wrinkles. Then, with the WRONG side of the backing facing the batting, lay the backing on top of the batting. Next, with RIGHT sides together, lay the quilt top on top of the backing. The 3 layers should be the same size, so trim away any excess fabric/batting. Now, pin the 3 layers together. Using a 1/4" seam, sew the layers together leaving a 12" opening on one side for turning the quilt right side out.
3) a tada moment (because you get to see your almost finished project - yey!): Turn your quilt right side out through the 12" opening. Then, on each edge of the 12" opening, turn 1/4" under toward the wrong side and press. Now, pin the opening closed.

4) Topstitching the quilt edges: Topstitch 1/4" from the outside edges of the quilt, consequently closing the 12" opening.


5) Quilt as desired.
And you're all done! Yey! (I think I say that too many times...lol) Share with me your lovely wholecloth quilts :)
And you're all done! Yey! (I think I say that too many times...lol) Share with me your lovely wholecloth quilts :)
Subscribe to:
Posts (Atom)
